What is Runpod?
Runpod is a Cloud Hosting Provider that allows you to rent Docker containers that are attached to various different sizes of GPU instances so that you can benefit from their Cloud GPU for running your AI tasks if you don't have a powerful enough GPU to run them yourself.
They offer various different types of services, including:
- Dedicated and On-Demand GPU Instances.
- Serverless GPU and CPU Hosting.
- AI API Endpoints.
This post focuses on their Serverless hosting which can be used to scale your application to hundreds of users.
Serverless Key Concepts
There are four main concepts:
- Serverless Handler
- Templates
- Endpoints
- Worker Types (Flex and Active)
Serverless Handler
This is a critical component for your application to function correctly
within Runpod Serverless. You need to import the runpod Python
module, and also ensure that you are using Python version 3.10.x because
the latest Runpod module is not compatible with Python versions prior
to version 3.10.x.
The Serverless handler is usually implemented in a file called
rp_handler.py (Runpod Handler) and looks something like the example
code below that will take a name as input and then send a greeting
back.
The Serverless handler accepts a JSON payload that contains an input,
and returns a response that contains an output.
Example Serverless Handler (rp_handler.py):
import runpod


def process_input(input):
    """
    Execute the application code
    """
    name = input['name']
    greeting = f'Hello {name}'

    return {
        "greeting": greeting
    }


# ---------------------------------------------------------------------------- #
#                                Runpod Handler                                #
# ---------------------------------------------------------------------------- #
def handler(event):
    """
    This is the handler function that will be called by Runpod serverless.
    """
    return process_input(event['input'])


if __name__ == '__main__':
    runpod.serverless.start({'handler': handler})
Local Testing
It is useful to test your Serverless Handler code locally before deploying
it to Runpod. You can do this by creating a file called test_input.json
with a body that looks like this:
{
    "input": {
        "name": "Ashley"
    }
}
You can then create a Python virtual environment and install the
runpod module as follows:
python3 -m venv venv
source venv/bin/activate
pip3 install runpod
Once the runpod module is installed, you can test your handler
locally as follows:
python3 -u rp_handler.py
This will return an output that looks similar to the following:
WARN   | RUNPOD_WEBHOOK_GET_JOB not set, switching to get_local
INFO   | local_test | Started
WARN   | Local test job results for local_test: {"output": {"greeting": "Hello Ashley"}}
INFO   | local_test | Finished
INFO   | Local testing complete, exiting.
Once you are happy with the results of your local testing, you are ready to deploy your application to Runpod Serverless. This will require you to build a Docker image containing your application code using a Dockerfile.
Building a Docker image for your application
First, you will need to create a Dockerfile that looks
similar to the following (Refer to the Resources link at
the bottom of this post for more advanced usage):
FROM python:3.10-slim

WORKDIR /
RUN pip install --no-cache-dir runpod
COPY rp_handler.py /

# Start the container
CMD ["python3", "-u", "rp_handler.py"]
Then you will need to log into your Docker Hub account:
docker login
When building your Docker image, it is best practice to
use a version rather than latest as a tag, since the images
are cached by the Runpod Serverless workers, and they will not know
that you have made a change to your image if you keep using the
same tag.
Runpod containers run on amd64 architecture, so if you are using
an Apple Silicon Mac to build the Docker image, you will need to use buildx
and specify the platform, for example:
docker buildx build --push -t username/imagename:tag . --platform linux/amd64
If you are building the image on an amd64 compatible
machine, you can build and push the image as follows:
docker build -t username/imagename:tag .
docker push username/imagename:tag
Once your image is pushed to Docker Hub, you are ready to create a Serverless Template for your image.
Templates
Navigate to your Runpod Serverless Templates and click
the New Template button.
A template is a specification for the Docker containers that will run your Serverless application.
The template specifies the Docker image that will be used, the container disk size, a Docker command (usually not required), and any environment variables.
Usually Docker Hub is used to store Docker images,
but you can also use other Docker container registries. If you choose to
use a private Docker registry rather than the public Docker Hub registry,
you will also need to provide Container Registry Credentials. The
credentials are not required if you use a Public registry.
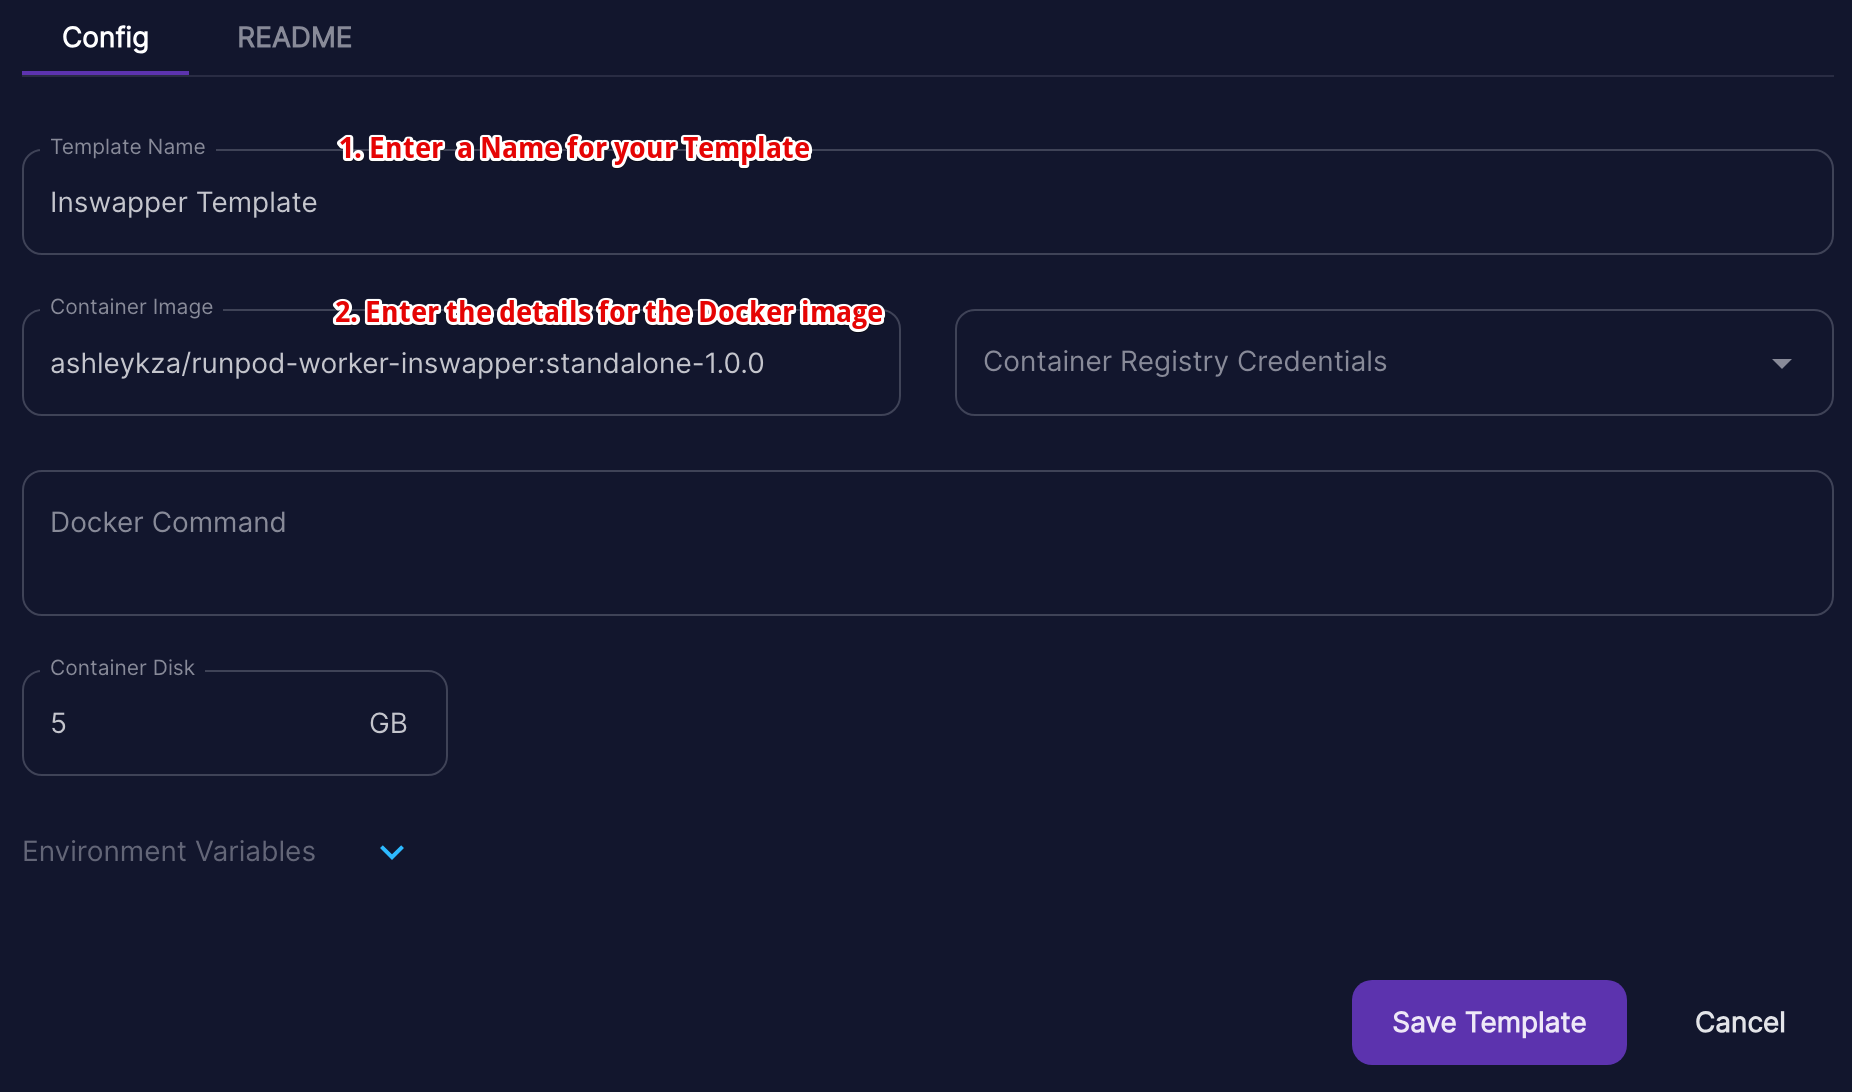
- Enter a name for your template.
- Enter the Docker image name for the Docker image that you want to use for your Serverless Endpoint.
- Leave
Container Registry Credentialsempty, unless you specifically require credentials for the Docker container registry that you are using. - Leave
Docker Commandempty, unless you specifically need to provide a Docker command for whatever reason, but this should not usually be required. - Set your Container Disk size. 5GB is usually sufficient and I have not yet found a specific use-case where it needs to be increased.
- If your application requires environment variables to be set,
click the dropdown arrow next to
Environment Variablesand enter your environment variables as Key => Value pairs.
Once your Serverless Template is created, you are ready to create a Serverless Endpoint.
Important Note
The key difference between a GPU cloud Docker image and a Serverless Docker image is that a Serverless image has a Serverless handler. A GPU Cloud template will not work in Serverless without the Serverless handler, so it is not recommended to use Docker images designed for GPU Cloud within Serverless.
Endpoints
Navigate to your Runpod Serverless Endpoints and click
the New Endpoint button.
An endpoint is your actual Serverless Endpoint that will provide a REST API endpoint for serving your application.
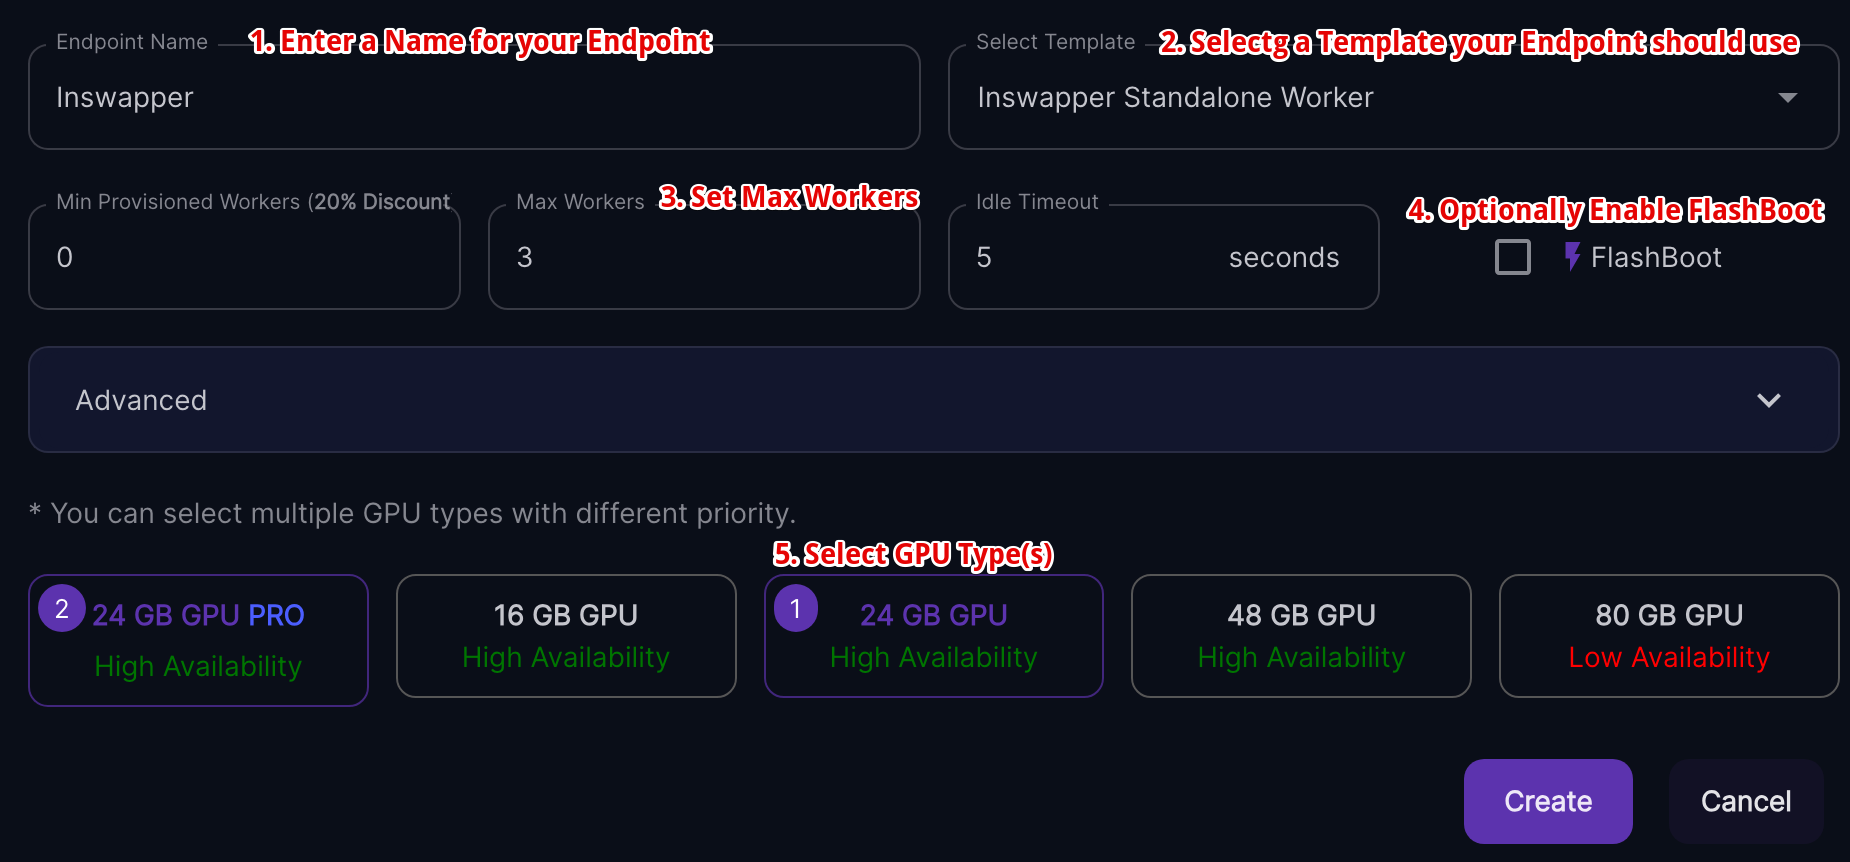
When adding a new Endpoint, you will need to configure a few things:
- Endpoint Name
- Template
- Max Workers
- GPU Types
You can also optionally configure:
- Min Provisioned Workers
- Idle Timeout
- FlashBoot
And additional Advanced options:
- Deployment Region
- Scale Type
- Network Volume
Endpoint Name
The endpoint name is a unique name for you to easily identify your endpoint, especially when you have multiple different endpoints.
Template
The Template is described above, and specifies the Docker image containing your application that should be pulled from the container registry (such as Docker Hub).
GPU Tiers
GPU tiers are the servers that will be used for the workers for your endpoint. The GPU tier you choose is dependent on the type of application you are running. For example, an LLM typically needs a lot more VRAM than running inference using Stable Diffusion. You can assign priorities to the various different GPU tiers. Once your priorities are assigned, you are able to limit your workers to using specific GPU types within that GPU tier, for example, if you select the 24GB GPU tier, you will be able to limit your workers to only using the 3090 GPU type and exclude the A5000 and L4 GPU types.
The available GPU tiers are:
| Tier | VRAM | Example GPUs |
|---|---|---|
| 16 GB | 16 GB | A4000, A4500, RTX 4000 |
| 24 GB | 24 GB | L4, A5000, RTX 3090 |
| 24 GB PRO | 24 GB | RTX 4090 PRO |
| 48 GB | 48 GB | A6000, A40 |
| 48 GB PRO | 48 GB | L40, L40S, RTX 6000 Ada PRO |
| 80 GB | 80 GB | A100 |
| 80 GB PRO | 80 GB | H100 PRO |
| 141 GB | 141 GB | H200 PRO |
| 180 GB | 180 GB | B200 |
CPU-only workers are also available if your application does not require a GPU.
Active (Provisioned) Workers
Active workers run 24/7 and allow your Serverless endpoint to respond much faster by eliminating cold start time. Runpod offers up to a 30% discount on Active workers compared to on-demand pricing, but I still don't recommend setting any Active workers unless you have consistent traffic that justifies the cost of keeping them running constantly.
Max Workers
The Max Workers are the maximum number of servers that run your application so that your application can be scaled up automatically across multiple servers to meet demand. The default of 3 is usually sufficient for development and testing purposes. If you set this to a value of 2 to 5, Runpod will provide you with additional workers (up to a maximum of 5) to help prevent your workers from being throttled. I don't recommend setting this to a value of 1, because there is a very high chance that your worker will become throttled, and your requests will sit in the queue for a long time before being processed.
GPUs/Worker
You can assign more than one GPU per worker for GPU tiers that support multi-GPU configurations.
Idle Timeout
Idle Timeout is the amount of time in seconds that your idle workers will remain running and waiting to accept new requests. You are charged for the timeout, so the default should be fine for most cases.
FlashBoot
FlashBoot is now enabled by default and delivers sub-second cold starts at no additional cost.
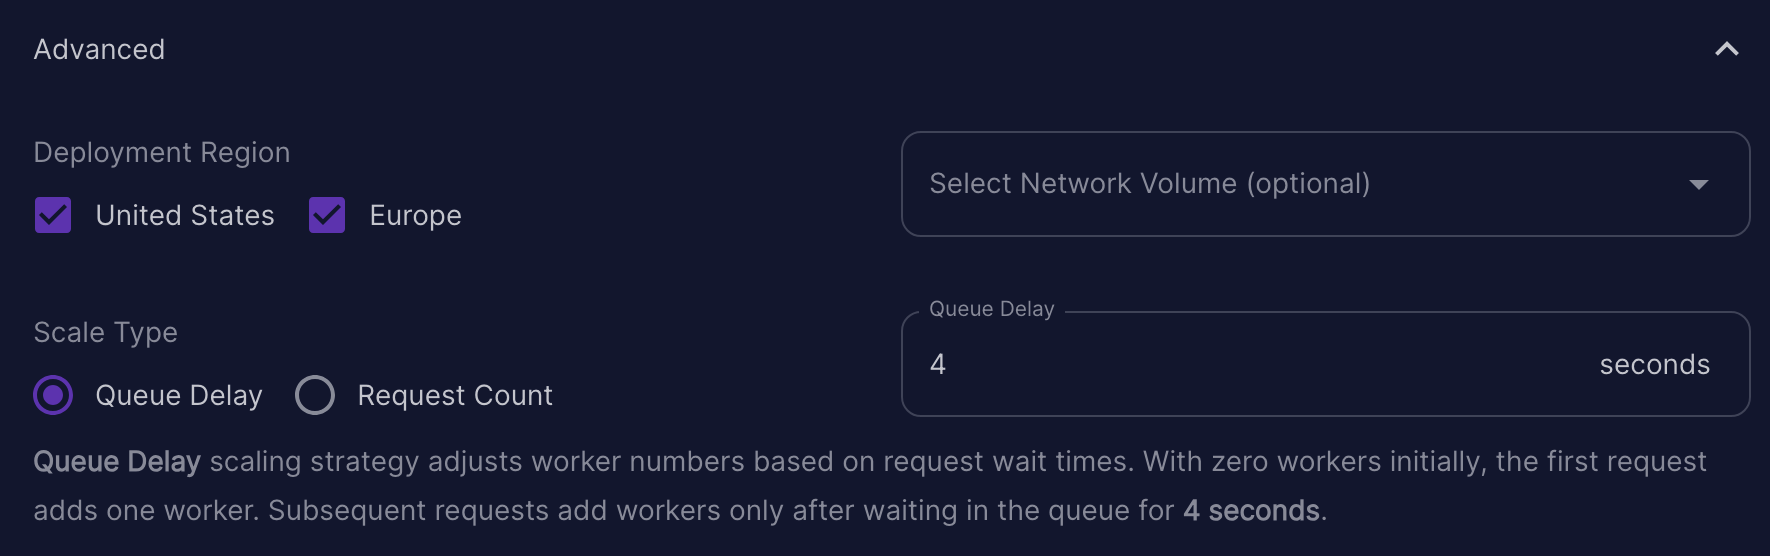
Data Centers (Advanced Setting)
By default, your application will by deployed in all data centers. If you have strict compliance requirements such as GDPR for example, you will want to restrict the data centers to Europe only.
If you are using a Network Volume, the Data Center will be automatically adjusted to the data center where your Network Volume resides.
Scale Type (Advanced Setting)
There are 2 different scaling Strategies:
- Queue Delay
- Request Count
The Queue Delay scaling strategy adjusts the number of workers
based on request wait times. With zero workers initially, the
first request adds one worker. Subsequent requests add workers
only after waiting in the queue for the number of seconds that
you specify for Queue Delay. The default is 4 seconds.
The Request Count scaling strategy adjusts the number of workers according to the total number if requests in the queue and in progress. It automatically adds workers as the number of requests increases, ensuring that tasks are handled efficiently. The default is 4 requests.
Total Workers Formula: Math.ceil((requestsInQueue + requestsInProgress) / 4)
Network Volume (Advanced Setting)
A Network Volume is basically Network Storage (similar to NFS). You can use a Network Volume for all your workers to be able to access the same files, for example if you have multiple different models that you want to use with your endpoint. You don't need a Network Volume to use Runpod Serverless, you can still deploy an application without using a Network Volume, but they are useful for certain use cases.
Network Volumes need to be added within the GPU Cloud section of the Runpod console. Runpod has significantly expanded their data center presence and now has GPUs across 31+ global regions, including locations in the United States, Canada, Europe, and Asia-Pacific (including Japan and Australia).
You can attach multiple Network Volumes from different data centers to a single endpoint for improved resilience and GPU availability. Check the Runpod console for the current list of data centers that support Network Volumes, as this list is frequently updated.
Worker Types
Runpod Serverless has two worker types:
- Flex Workers scale from zero to your configured max workers based on demand. You only pay for the time your workers are actively processing requests. This is the default and recommended type for most use cases.
- Active Workers run 24/7 and eliminate cold start time entirely. They are best suited for applications with consistent, predictable traffic. Runpod offers up to a 30% discount on Active workers.
Advanced Handler Features
Since the initial release of the Runpod SDK, several new handler types have been added:
- Streaming Handlers use
yieldto return results incrementally, which is useful for LLMs and other applications that produce output progressively. Streaming results can be consumed via the/streamendpoint. - Async Handlers support
async/awaitfor concurrent I/O operations. - Concurrent Handlers allow a single worker to process multiple requests simultaneously, which is useful for lightweight operations.
Additional SDK features include:
- Progress Updates via
runpod.serverless.progress_update()to report progress back to the caller during long-running jobs. - Worker Refresh by returning
{"refresh_worker": True}in your handler response to reset worker state between jobs. - Local API Server by passing
--rp_serve_apiwhen running your handler locally, which starts a local FastAPI server that mimics the production endpoint for more realistic testing.
Resources
- Runpod Serverless Documentation
- Runpod Python SDK on GitHub
- Runpod Official Base Docker Images
- YouTube Tutorials by Generative Labs
- Source Code to Runpod's Own Endpoints
- Source Code to My Face Swap Endpoint
- Source Code to My Upscaling Endpoint
- Source Code to My LLaVA Endpoint
- Source Code to My A1111 Stable Diffusion Endpoint
- Source Code to My Oobabooga Text Generation Endpoint